Getting Started
3 minute read
Requirements
Required Components
- Raspberry Pi Compute Module 5 (CM5 or CM5 Lite)
- CM5 with eMMC or CM5 Lite (SD card boot)
- CM4 is not supported on Cruiser
- DC Power Supply — 5.5/2.1mm barrel jack (center positive)
- Cruiser/Cruiser Lite: 48-57V DC (48V minimum for PoE+)
- Cruiser Keel: 13-57V DC (24V+ recommended)
- Storage — At least one of:
- NVMe SSD (M.2 Key-M, 2230/2242/2260/2280)
- SATA drive (HDD or SSD)
- Micro SD card (CM5 Lite only)
- Cooling Solution — Heatsink for CM5
Optional Components
- HDMI cable(s) for display output
- USB keyboard/mouse for initial setup
- Interceptor PoE Board for +8 PoE ports (100Mbps)
What’s in the Box
- Cruiser Carrier Board
- Quick Start Guide
Board Layout
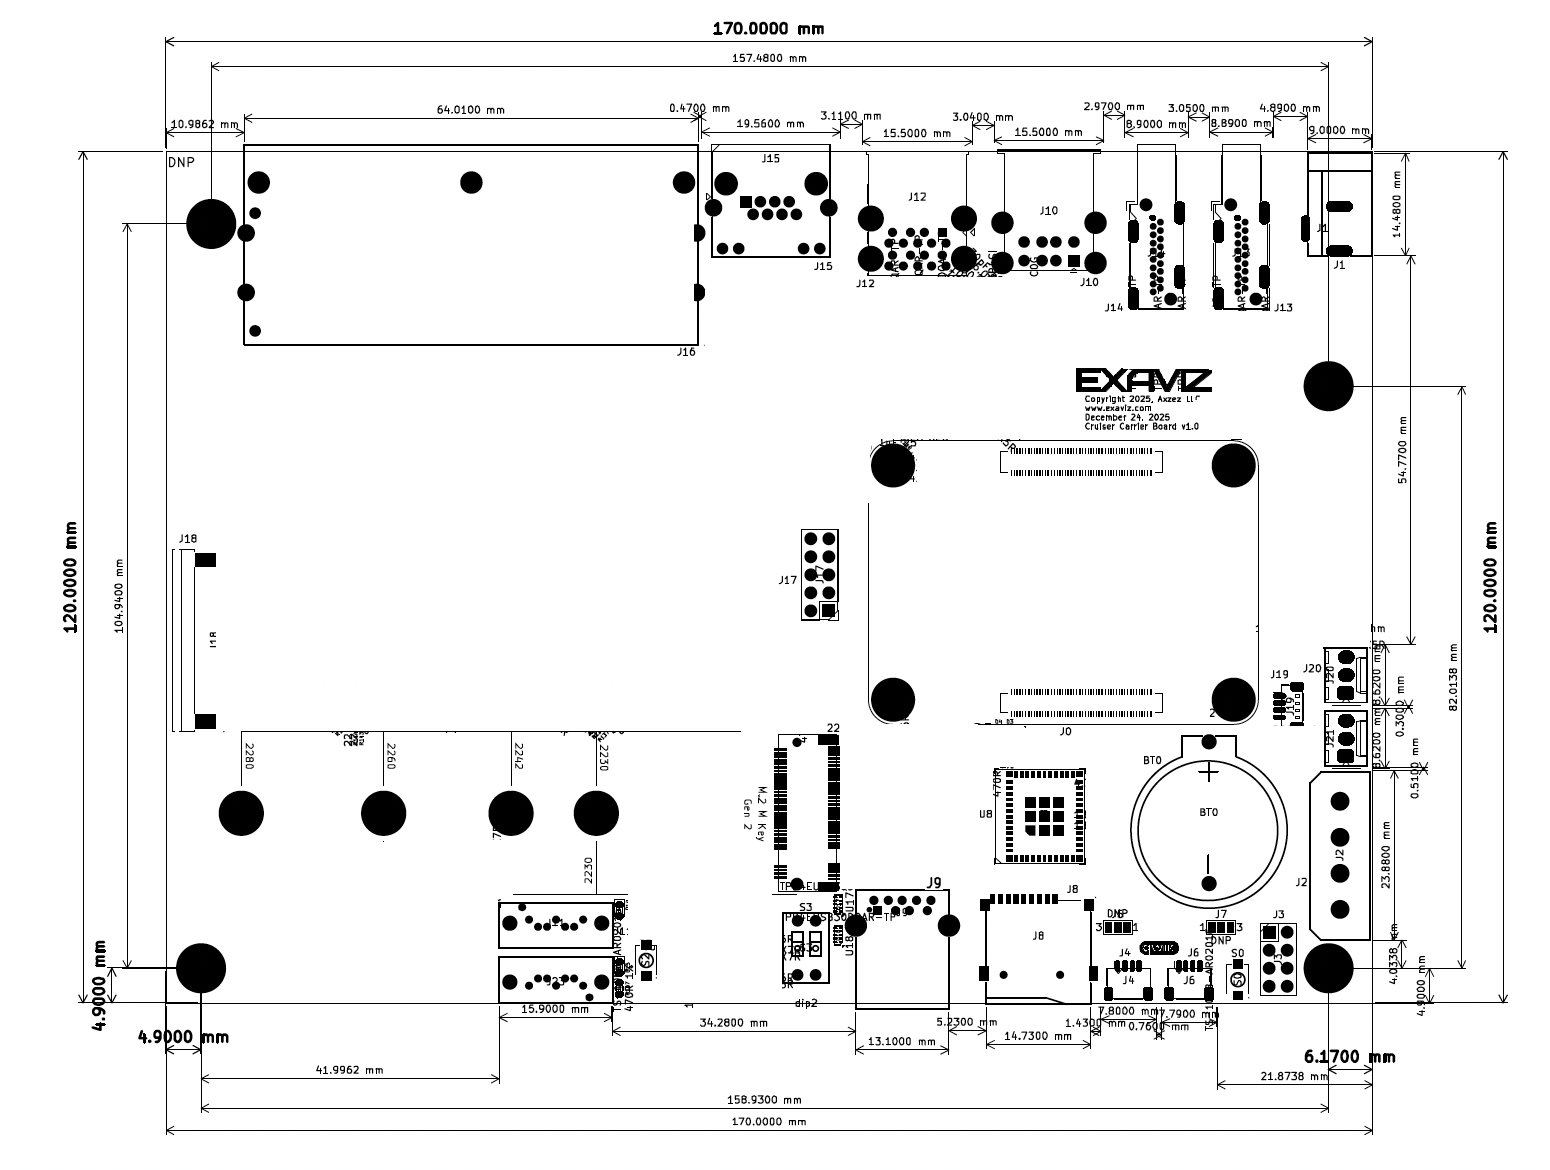
Back Panel (I/O Shield Side)
From left to right when facing the back:
| Ref | Connector | Description |
|---|---|---|
| J1 | DC Barrel Jack | DC power input (see requirements above) |
| J13, J14 | HDMI | 2x HDMI 2.0 (4Kp60) |
| J10 | USB 2.0 | 2x stacked Type-A |
| J12 | USB 3.0 | 2x stacked Type-A |
| J15 | 2.5GbE WAN | RJ45 network uplink |
| J16 | Switch Ports | 4-8x RJ45 1GbE (model dependent, PoE on Cruiser/Lite) |
Front Panel
| Ref | Connector | Description |
|---|---|---|
| J8 | Micro SD | SD card slot |
| J9 | USB 3.0 | Single Type-A port |
| J4, J6 | Qwiic | I2C expansion connectors |
| J3 | Pin Header | UART, power button, power LED |
| S0 | Power Button | Onboard power control |
Installation Steps
1. Install the Compute Module
- Locate the CM5 connector (J0) — two 100-pin board-to-board connectors
- Align the CM5 module with the connector
- Press down firmly until the module clicks into place
- Attach a heatsink to the CM5 for cooling
2. Connect Storage
Choose your storage configuration:
NVMe SSD (Recommended):
- Insert NVMe drive into M.2 slot (J22)
- Secure with the M.2 screw
SATA Drives:
- Connect SATA data cables to J11 and/or J23
- Connect power via Molex connector (J2)
Micro SD (CM5 Lite only):
- Insert SD card into slot (J8)
3. Connect Power
- Connect a 48V DC power supply to the barrel jack (J1)
- The board will power on automatically
- LEDs indicate status:
- D2 (Blue): Standby
- D3 (Yellow): Power On
- D4 (Green): Activity
4. Connect Display and Peripherals
- Connect HDMI cable(s) to J13/J14
- Connect USB keyboard/mouse to USB ports
- Connect network cable to WAN port (J15)
First Boot
Installing the OS
The Cruiser works with standard Raspberry Pi OS or any Debian-based distribution for CM5. No custom OS image is required.
Recommended: Download Raspberry Pi OS (64-bit, Trixie or later).
Flash the OS image using:
- Raspberry Pi Imager (recommended)
- Balena Etcher
- dd (Linux/macOS command line)
For NVMe installation, you may need to flash via a USB-to-NVMe adapter first, or boot from SD card and flash to NVMe from the running system.
Most hardware works out of the box. Install the exaviz-dkms package for full
functionality. See Installing exaviz-dkms
for installation instructions.
Network Configuration
The Cruiser has two network interfaces:
| Interface | Port | Speed | Use |
|---|---|---|---|
| WAN | J15 | 2.5 GbE | Uplink to network |
| Switch | J16 | 1 GbE each | Network devices (PoE on Cruiser/Lite) |
The 2.5GbE WAN port may require manual configuration. See Configuring the Upstream / WAN Port for instructions on setting up DHCP or static IP.
Default Credentials
Standard Raspberry Pi OS defaults:
- User:
pi - Password:
raspberry(or set during first boot) - SSH: Disabled by default (enable via
raspi-configor createsshfile on boot partition)
Change the default password immediately after first login!
Next Steps
- Hardware Interface — Detailed connector reference
- Cruiser Software — WiFi, PoE control, and storage setup
- ESP32 Wireless Module — WiFi, Bluetooth, and Zigbee configuration
- Specifications — Full technical specs
Last modified October 11, 2026